Quantcast
Channel: plugins : The TeamCity Blog | JetBrains Blog
Viewing all 91 articles
Browse latest View live

TeamCity Twitter Notifier

$
0
0

TeamCity provides several ways of getting notified about your builds’ status, like e-mail notifications, Jabber/XMPP instant messages and more. All the notifiers allow flexible customization to fit your needs.

However, there are other ways to keep track of your projects. For example, Scott Cowan has created TeamCity Twitter Notifier plugin. The installation is easy, and providing that Twitter allows to create private accounts, you can keep project notifications both restrictive and accessible. So if you like to twit, give it a try!

Twitter Notification

By the way, check the list of the plugins for TeamCity – you may find something interesting for you, or try to create your own.

Sincerely,
The JetBrains TeamCity Team


Control your builds queue with Build Priorities

$
0
0

In the first TeamCity 6.0 EAP you can find the long-awaited feature — build priorities; you asked — we did it. Moreover, since it is implemented as a Build Queue Priorities plugin for TeamCity, it is also available for TeamCity 5.1.x.

Now you can control build priorities by creating so-called Priority Classes — in two words, a priority class is a set of build configurations with a specified priority. Naturally, these classes can be configured from the Build Queue page, but note that only users with System administrator role can access these settings.

You can add as many priority classes as you need, add build configurations to them according to your needs and define the priority in the range -100..100. This setting is taken into account only when a build is added to the queue. The builds with higher priority will have more chances to appear at the top of the queue; however, you shouldn’t worry that the build with lower priority won’t ever run. If a build spent long enough in the queue, it won’t be outrun even by builds with higher priority.

Also note that by default you already have two predefined priority classes — Personal (priority=10) and Default(priority=0).
The first one is used for personal builds (Remote run or Pre-tested commit) only, i.e. any personal build added to the queue will be assigned to this priority class. The Default class simply includes all the builds not associated with any other class. This allows to create a class with priority lower than default and place some builds to the bottom of the queue.

We’ve had a lot of discussions about this feature, because there were many ways to implement it. We picked the one that seems the best, however we encourage you to try it and share your feedback with us. Try it!

The JetBrains TeamCity Team

Changing .NET properties

$
0
0

As we promised, we continue the configuration parameters story started in the previous post. Today, I’d like to tell you about .NET related properties.
TeamCity .NET plugins provide a bunch of predefined properties indicating that .NET Framework/SDK/Visual Studio/Mono are detected on build agent. Previously you could refer to these properties as to system properties. Now we’ve changed it.

We decided to turn all these properties into configuration parameters, and therefore we’ve converted all refernces to such properties detected in TeamCity to keep builds running. However, it’s not possible to convert references used from a build script. To workaroud the issue you can add system property in build agent configuration or use compatibility mode switch in TeamCity properties:

  • teamcity.dotnet.properties.compatibility.mode with value true
  • dotNetPropertiesCompatibilityMode configuration parameter with value true in a build configuration settings.

Here is the list of changed parameters:

Before Now
system.DotNetFrameworkX.Y DotNetFrameworkX.Y_x86
system.DotNetFrameworkX.Y_Path DotNetFrameworkX.Y_x86_Path
system.DotNetFrameworkX.Y_xZZ DotNetFrameworkX.Y_xZZ
system.DotNetFrameworkX.Y_xZZ_Path DotNetFrameworkX.Y_xZZ_Path
system.DotNetFrameworkSDKX.Y DotNetFrameworkSDKX.Y_x86
system.VS200X VS200X
system.Mono Mono
system.MonoVersion MonoVersion
system.WindowsSDKX.Y WindowsSDKX.Y

Note, there will no longer reported .NET Framework configuration parameters without explicit bitness (i.e. x86 or x64).

Load Testing with TeamCity and BlazeMeter

$
0
0

imageBlazeMeter is a cloud-based load testing platform for web applications, mobile applications and web services. It can be used to simulate heavy loads on a server and analyze performance under different load types. And since there’s a TeamCity plugin for BlazeMeter available, we can use it to load test or smoke test our application during the build and deployment process.

Installing and configuring the plugin

The BlazeMeter plugin for TeamCity can be downloaded and installed into the plugins folder under TeamCity’s data folder. After restarting the TeamCity server, there is one additional step in order to be able to start using the BlazeMeter plugin for TeamCity: configuring it with our BlazeMeter user key.

Under Administration | Integrations | BlazeMeter, we can enter the user key obtained from the BlazeMeter web site (under user profile).

image

Adding a BlazeMeter build step to a build configuration

To run a load test using BlazeMeter after building and deploying an application, we can add a new build step to our build configuration. The BlazeMeter plugin for TeamCity adds a new build runner type which we can select.

image

The BlazeMeter plugin for TeamCity will list all available load tests in the build step configuration. We can select the test to run and specify the error percentage and response time thresholds. The total load test duration should also be specified.

image

Once saved, we can run a build configuration and see load test results come in.

Inspecting load test results

After running a build configuration in which BlazeMeter is used, we will see a new report tab on the build results page: BlazeMeter Report Tab. Using this, we can analyze results of the load test run during this build.

image

From this tab, we can analyze the load test results, see errors that occurred in the application during the load test run, see measured page load times and so on. We can also compare with previous load test results if needed.

A short screencast on installing and configuring the BlazeMeter plugin for TeamCity is also available.

Explaining the Shared Resources plugin

$
0
0

This post describes one of the new features in the upcoming TeamCity 8.0

Using TeamCity, we can easily set up a build farm using a central TeamCity server and several connected build agents. By having multiple build agents, we can run builds and build configurations in parallel. Different branches of the same project can build simultaneously on different build agents,  personal builds can be run on one build agent while the nightly build is running on another agent and so on.

But what if we have multiple build agents and we want to constrain parallelism for some projects? What if we do want to have parallelism but want to provide different build variables to each build? Good questions, and the Shared Resources plugin is the answer!

The Shared Resources plugin comes bundled with TeamCity 8.0 EAP. In TeamCity 7.1.x it has to be installed separately. Sources for this plugin are available on GitHub.

Limiting concurrent builds with simple named resources

The Shared Resources plugin works at the project level. Per project, we can specify one or more shared resources which we can use to decide on the number of concurrent builds for a given project and build configuration.

In the Project Home under the Shared Resources tab, we can specify the resources we want to be able to lock. A shared resource should be given a name which can be used later on in our builds. The resource type can be infinite (effectively not limiting build concurrency), a resource with quota and a resource with custom values. Let’s go with resource with quota.

The resource quota is the number of concurrent read locks that can be acquired on the resource. Or in other words: the maximum number of concurrent builds we want to run. Let’s be restrictive and set the quota to 1.

Add Shared Resource in TeamCity

None of the Build Configurations will obey these quota: we have to add a Shared Resources Build Feature to every Build Configuration we want to subject to these quota. This can be done in the Build Configuration. Under Build Features, we can add a Shared Resources build feature which acquires a read or write lock on the shared resource created earlier.

Add Build Feature

Once added, the build configuration will only be run on one build agent at a time. Personal builds as well as regular builds will all be enqueued and wait for the lock on the shared resource to be released, even if one of the build agents is idle.

Note that it is possible to await multiple locks in a build configuration.

Working with custom resource values

While working with simple named resources may be useful, it may be worth having a custom resource value for every lock acquired. Imagine we have a build which has a custom build step running load tests on a server. Wouldn’t it be nice if we could limit the number of concurrent build based on the number of load test targets available and be able to get the URL to one of these servers in our build? We can using a set of custom resource values.

When creating a new Shared Resource, we can specify the type as a resource with custom values:

Custom resource values

In our build, we have several options available to acquire a lock on this shared resource. We can lock on any value that is not locked, we can lock on all values or on a specific value. For our purpose of needing a dedicated load testing machine, we can opt to lock on any available value.

List of resources lock

Once added, we will not be able to run more builds concurrently than the number of available values in our custom shared resource. If we need the value of the locked value during our build, we can read it using the %teamcity.locks.<lockType>.<lockName>% variable, %teamcity.locks.readLock.RunTestsAgainstServer% in our case. For example when working with build parameters, we can use the lock value as a custom parameter:

Custom parameter based on shared resource lock value

Where can I manage shared resources?

So far we’ve seen that shared resources can be added for every project separately and used in that project’s build configurations. With TeamCity 8.0, we’ve introduced project groups which allows us to group several projects under a project group. Shared resources can be added to both the project group as well as the individual projects. Locks can be acquired for every build configuration in a project and/or project group, making it possible to have shared resources across projects as well.

Do let us know your thoughts via the comments below. Dive in, experiment and… happy building!

TeamCity Torrent Plugin

$
0
0

Today we have some interesting news for you – the Torrent plugin for TeamCity!

With this plugin, users and build agents can download TeamCity build artifacts faster, especially in a distributed environment.

A bit of the BitTorrent protocol details

For those of you who are not familiar with BitTorrent – this is a peer-to-peer protocol. It means there is no single server for shared files. Instead, the files can be downloaded from peers that already have these files or parts of them.

Still, a server is required to find peers. This server is called a torrent tracker. To download a file, a peer must have a torrent file describing the required file. With this torrent file, the peer goes to the torrent tracker, and the tracker provides addresses of other peers in the network sharing the file.

A peer that does not have the file yet but wants to download it is called a leech. A peer that has the file and wants to share it is called a seeder.

Applying it to TeamCity

So what TeamCity Torrent plugin does – it turns TeamCity into a torrent tracker for all published artifacts greater than the specific size: by default, the artifacts of size less than 10 megabytes are not available via the BitTorrent protocol as it is not very efficient for small files. Additionally, the TeamCity server becomes a seeder for these artifacts. So for every artifact there is always one seeder in the network.

On top of that, when an agent decides to download an artifact dependency, it can choose to use the BitTorrent protocol instead of HTTP if there is more than one seeder available. Once the agent downloads the file, the agent itself automatically becomes a seeder for this file. When the agent publishes the artifact to the TeamCity server, both the server and agent start seeding it. So if you use TeamCity artifacts a lot, eventually you’ll end up with quite a number of agents seeding artifacts. Not only does this increase the speed of the artifacts delivery to agents, but it also reduces the load on the TeamCity server.

Finally, the users who have Torrent clients installed can also download files from TeamCity via the BitTorrent protocol.

Setting up the plugin

The plugin is compatible with version 8.1, so to try it, you need to install the latest TeamCity EAP build. Grab the plugin here and install it as usual.

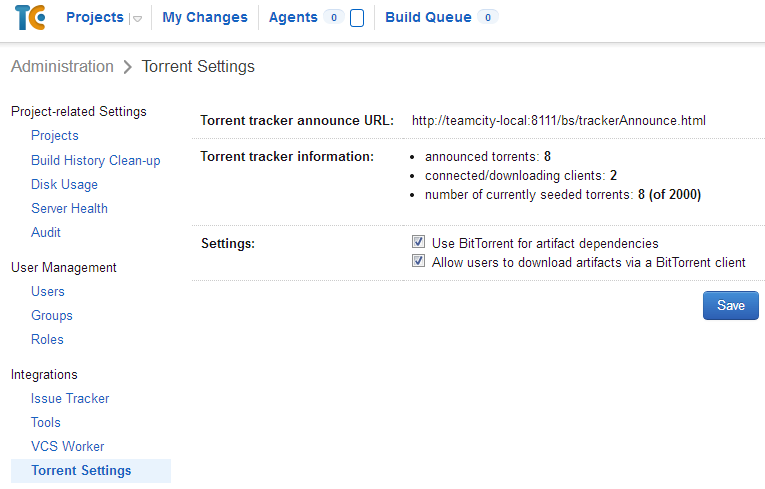
Once you restart the server, a new link, Torrent Settings, will appear in the Administration area. The plugin is disabled by default. You can enable it on this page:

Verifying the plugin works

If the plugin works correctly and you checked both options on the Torrent settings page, then once a large enough artifact is published, you should see the following icon near the artifact name:

Clicking this icon should start your favorite torrent client. And this is what it looks like for some of the widely used artifacts on our server:

If a build has an artifact dependency on some artifact, you should see the attempts to download the artifact via torrents in the build log:

Please try this plugin and let us know what needs to be improved!
Happy building!

Introducing TeamCity Azure plugin – Run builds in the cloud

$
0
0

Microsoft AzureIn a large TeamCity setup with many projects, it’s often very difficult to predict the load on build agents, for example during releases. One minute we need only one agent to be running, the next minute we need 50. Not to worry! TeamCity supports scaling out builds to Amazon EC2, and starting today, also Microsoft Azure!

For each queued build, TeamCity first tries to start it on one of the regular, non-cloud agents. If there are no regular agents available, TeamCity finds a virtual machine or virtual machine image with a compatible agent and starts it on Azure. TeamCity ensures that the configured maximum number of instances is never exceeded. Let’s have a look at how we can get started with a Windows or Linux build agent farm on Microsoft’s cloud platform.

Installing the TeamCity Azure plugin

First things first, of course. The TeamCity Azure plugin is not bundled and therefore has to be installed on our TeamCity server. It is compatible with TeamCity 8.1 and the EAP of TeamCity 9. Shutdown the TeamCity server, download the latest version of the plugin from our build server and copy the downloaded zip archive to the <TeamCity Data Directory>/plugins directory. Next, start the TeamCity server again and verify the plugin was loaded correctly from the Administration | Plugins List page.

Plugins List

Once that’s done, we can get started with creating a virtual machine or virtual machine image for our build farm.

Preparing a Virtual Machine (Image) with TeamCity Agent

We’ll need to create a virtual machine (image) on which our builds will run. In short, we need to create a Windows or Linux virtual machine:

  • on which all build prerequisites are installed (e.g. Java, .NET, Visual Studio SDK’s, …).
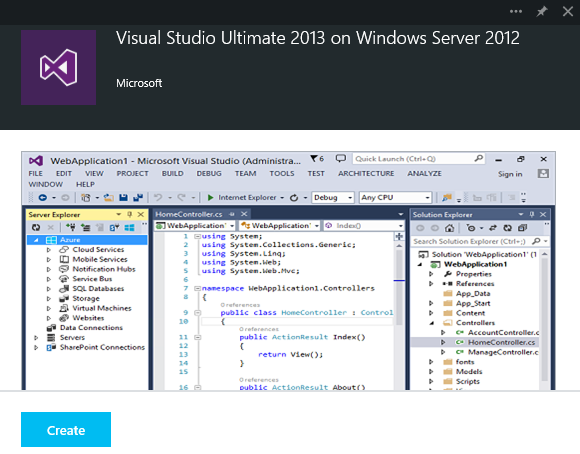
    Tip: When you plan on testing this plugin for .NET builds and have an MSDN-enabled Azure subscription, this is a step that can be quickly done by creating a virtual machine from a readily-available Visual Studio image.
    Visual Studio MSDN image on Azure
  • on which a TeamCity build agent is installed and configured.
  • on which we’ve opened port 9090 (or a port range in case we want to have TeamCity create virtual machines for us) in the operating system firewall and as an endpoint on the Azure load balancer. This is required to enable two-way communication between TeamCity server and the agent.
  • with which we have tested the connection between the TeamCity server and the build agent.

If we want TeamCity to create virtual machines for us, we will also have to create a generalized image of he virtual machine we’ve just created. Check the full documentation for a detailed list of steps involved in creating a build agent virtual machine (image).

Configure the TeamCity Azure plugin

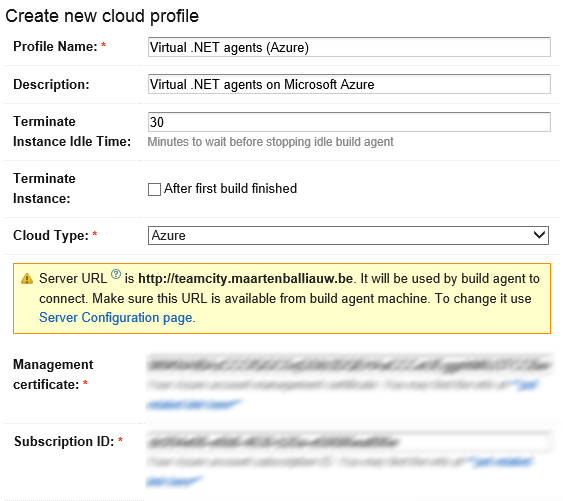
Once we have the plugin installed and have a virtual machine (image) our builds can run on, we can configure the TeamCity Azure plugin. From the TeamCity | Administration | Server Administration | Agent Cloud page, we can create a cloud profile with the “Azure” type.

We will need at least a name for our cloud profile. The Terminate Instance Idle Time is an important one to configure: it tells TeamCity how long an instance can be idle before it will be stopped. As Microsoft calculates costs based on the number of minutes a machine runs, it is recommended to adjust this setting according to our usual build length. This reduces the amount of time a virtual machine is running and thus, reduces the cost.

Create an Azure cloud profile

TeamCity will need two more things to be able to provision virtual machines on Azure: a management certificate and the ID of the subscription in which to deploy build agents. After downloading the publish settings, find these values in the downloaded XML files and paste them in the plugin configuration.

Clicking Add Image lets us specify the virtual machine (image) we want TeamCity to run. The TeamCity Azure plugin supports two modes of operation:

  • Start/stop, which starts and stops an existing virtual machine on demand.
  • Image-based, which creates and destroys virtual machines based on an image.

Let’s go with an image-based approach and provision up to 10 agents based on the TC-Agent image I’ve created. We have to specify the service in which we want to provision virtual machines. The service must be either empty or contain only a virtual machine deployment. It is recommended to create a new, empty service for this.

Next we can choose the VM size, as well as a username/password for the user that will be created during the provisioning process. Note that the password has to match Azure’s password requirements.

Run TeamCity agent in Azure

After adding the image and saving the cloud profile, TeamCity does a test start for them to learn about the agents configured on them. Once agents are connected, TeamCity stores their parameters to be able to correctly process build configurations-to-agents compatibility.

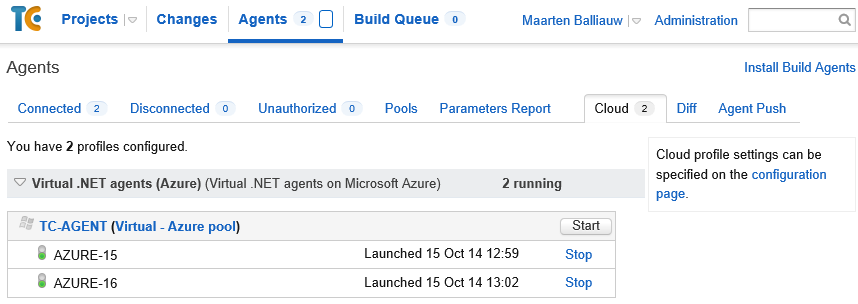
From now on, TeamCity will first try to start builds on regular build agents. If none are available, it will start compatible agents in Azure. We can see the running images from the Agents | Cloud page and optionally start/stop them as needed.

TeamCity agent running in Azure

Head over to the documentation for the TeamCity Azure plugin and give it a try.

Happy building in the cloud!

TeamCity integrates with Visual Studio Online and Azure – Special offer for MSDN subscribers

$
0
0

teamcity-visual-studio-online-vsoA large number of TeamCity users are working with Microsoft technologies and platforms such as Visual Studio Online and Azure, both fantastic tools in their respective areas. We are really excited to announce several new integration points between TeamCity and these tools!

Special TeamCity Offer for MSDN Subscribers

Today we are launching a special offer in partnership with Microsoft. All MSDN subscribers are eligible for a 50% discount on new TeamCity Enterprise licenses. Visit the MSDN special offers page to see the details and apply for the discount.

This is the first time TeamCity offers such a bargain for its commercial licenses. If you were planning on upgrading to Enterprise, this is definitely the right time to do it!

Building from Visual Studio Online Source Control

Visual Studio Online provides excellent source control, with support for Team Foundation Version Control and Git. TeamCity supports building projects that are hosted on Visual Studio Online and provides a powerful and comprehensive continuous integration story because of its advanced features to automatically run builds for feature branches,  automatic merge and many others.  Read more in the dedicated blog post on TeamCity and VSO source control.

Work Item Integration

Continuous integration becomes more powerful when we have full traceability from source control to builds to issue tracking and vice-versa. The Visual Studio Online Work Items plugin gives us a direct link between the build and version control history in TeamCity and the Work Items that were associated with them.

Work Item integration with TeamCity

Team Room Notifications

Quick feedback on changes and communication are the corner stones of agile teams. Visual Studio Online users can collaborate in a Team Room and discuss what is going on in the project. With the Visual Studio Online Team Rooms plugin for TeamCity, the build server becomes a member of our team by posting notifications around builds to the team room.

VSO notification

Elastic Cloud Build Agents on Azure

Very often it is difficult to predict the load on build agents, for example during releases. One minute we need only one or two build agents, the next minute we have 50 builds queued up. Using the elastic nature of cloud platforms like Microsoft Azure, we can scale out our build farm when needed. The TeamCity Azure plugin provisions and deprovisions virtual machines when needed, perfectly aligning capacity demand of our build farm with its running cost.

If you’re using or planning to use Visual Studio Online together with TeamCity, give these plugins a try! They provide great interoperability between both products, providing a best-of-breed solution for development teams. Keep an eye on this blog, as we’ll be writing more about these integrations in the coming days.

And remember: all MSDN subscribers are eligible for a 50% discount on new TeamCity Enterprise licenses. Visit the MSDN special offers page to see the details and apply for the discount.

Happy building!


Integrating TeamCity and Visual Studio Online Work Items

$
0
0

Continuous Integration only makes sense if there’s an easy way to verify the quality of our codebase and when we can easily correlate builds with our issue tracker and the source code itself. Out of he box, TeamCity provides integration with YouTrack, JIRA and Bugzilla. We can also install plugins to integrate with other issue trackers like GitHub and FogBugz. Today, we’re happy to announce another issue tracker integration: the Visual Studio Online Work Items plugin.

We’ve already blogged about how we can link Visual Studio Online source control with TeamCity and run our builds.When using Visual Studio Online (VSO) as an issue tracking system as well, we can use the Work Items plugin to provide a direct link between the build and version control history in TeamCity and the Work Items that were associated with them.

Work Item integration with TeamCity

How does it work?

After installing and configuring the Visual Studio Online Work Item plugin, TeamCity will parse version control check-in messages and transforms the Work Item ID into a link that brings us to the full work item. A direct link will be available on the Changes tab of our build results. The Issues tab will show us a list of all Work Items that are associated with the build. And in the build configuration home page, we can also review Work Items mapped to comments from the Issue Log tab.

Work Item link in Changes

The plugin does not look at the Work Item Association, but instead uses the check-in message to provide these links. This has a big advantage: it works with both Team Foundation Version Control (TFVC)-based projects as well as the increasingly popular Git-based projects. This does mean we have to keep two things in mind:

  • When checking-in changes, always mention the related Work Item ID in the check-in comments.
  • On the Issue Log tab of a build, we can tick the Show only resolved issues option to only display issues that were fixed in the build. This does mean we have to resolve Work Items when they are fixed.

How to configure it?

To enable integration, we need to first install the Visual Studio Work Items plugin. Next, we have to create a connection to our Visual Studio Online project from the Administration | Issue Tracker page. After selecting the Visual Studio Online connection type, we have to provide a display name, our Visual Studio Account name, and a username and password to connect to it. Do make sure to enable alternate credentials in Visual Studio Online!

We also have to provide the collection, the project name and the issue pattern to detect. The default is #(\d+), which will recognize Work Item IDs that look like #10, #99 and so on. We can customize this so we can detect other patterns. The Test Connection button lets us verify all connection details are correct.

Visual Studio Online configuration

Once saved, TeamCity starts to match each Work Item ID it recognizes in the project’s check-in history.

Happy building!

Send Visual Studio Online Team Room Notifications from TeamCity

$
0
0

Continuous Integration is all about quick feedback on changes in our code. TeamCity lets us subscribe to important events that may take place during the build process, such as succesful builds, build failures and so on. Email, Jabber, IDE and Windows Tray notifications are supported out of the box, but we can also post these notifications to Visual Studio Online Team Rooms using a newly released plugin.

VSO notification

With Visual Studio Online Team Rooms, we can keep a record of things that happen in our team – checkins, work item updates, code reviews and so on. Team members can have conversations with each other directly in the team room. TeamCity can contribute to the conversation, by posting notifications around builds to the team room. Let’s see how we can configure this integration.

Enabling and Configuring Team Room Notifications

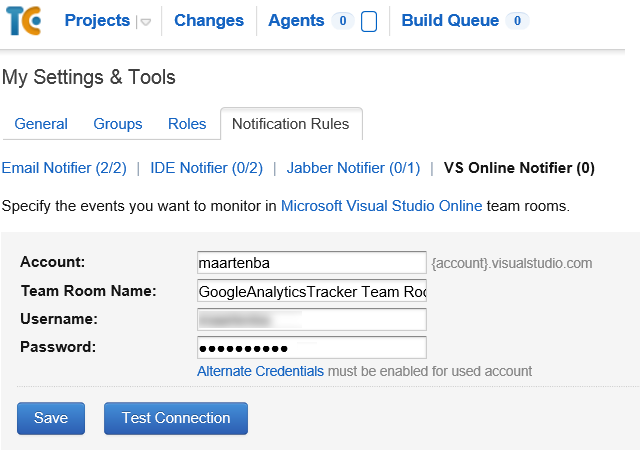
After installing the plugin, we have to enable the integration from the Administration | Server Administration | VS Online Notifier page. Once done, we can configure notifications from within a user profile. In the top right corner of the screen, we can click the arrow next to our username and select My Settings & Tools from the drop-down. We can then setup notifications under the VS Online Notifier tab.

Setup Visual Studio Online Team Room notifications

Team Room notifications will be sent by the user profile we configure here. We’ll have to provide the Visual Studio Online account name, the full Team Room name and a username and password to connect to it. Do make sure to enable alternate credentials in Visual Studio Online to be able to send notifications on behalf of this user.

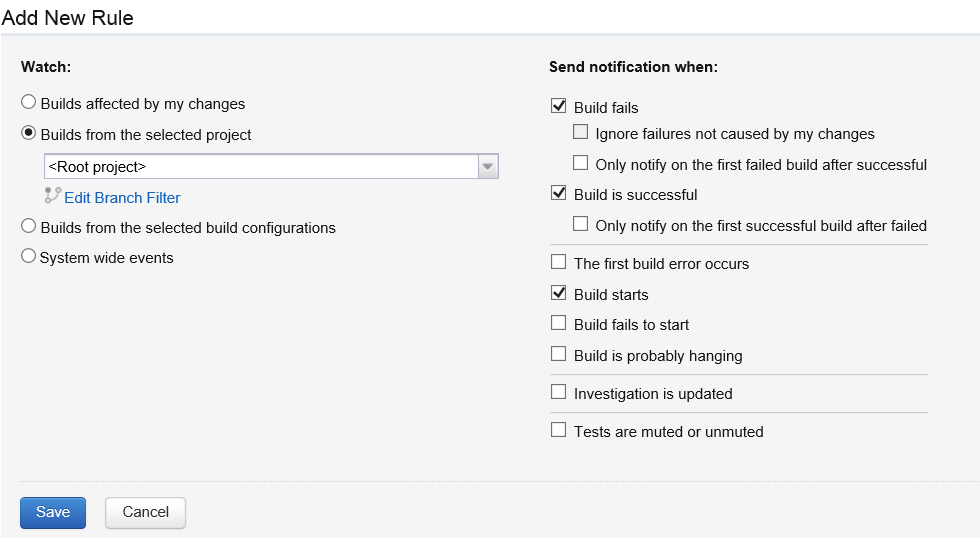
Once the connection has been tested and saved, we can tell TeamCity which notifications we want to see for one or more build configurations. Check the documentation for a list of the available notification options and how to work with them.

Add new Rule

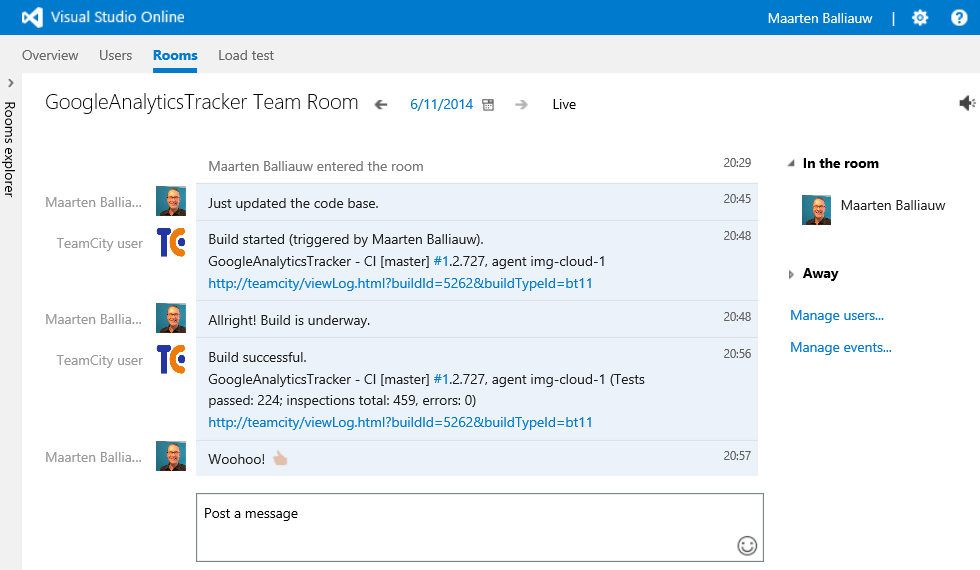
After saving the rule, TeamCity will send notifications to the configured Visual Studio Online Team Room as events happen.

TeamCity posts message to VSO team room

Every TeamCity user can configure these notifications. In the above screenshot, we’ve created a special “TeamCity user” in Visual Studio Online. It’s perfectly possible to send notifications from other users, too. When multiple users have configured the same events, TeamCity will merge these messages in one so the Team Room is not flooded with the same information.

We can add more information to the notifications if needed, by customizing notification templates. For example, we can add the error messages from the build log or add additional build details in the notification.

Happy building!

TeamCity brings Azure Resource Manager support

$
0
0

arm-logo

Microsoft has recently introduced a new way to deploy cloud resources, so currently there exist two Azure deployment models supported by TeamCity as two separate plugins.

The earlier Azure deployment model is in the feature freeze state and is now called Azure Classic. The same goes for the existing TeamCity Azure support, now called TeamCity Azure Classic plugin.

Azure Resource Manager is the new Azure deployment model, which has some advanced features and is now becoming popular. More and more users want to deploy cloud agents with it, so today we are glad to announce a new plugin, the Azure Resource Manager plugin for TeamCity.

Plugin Description

The plugin for TeamCity starts new cloud build agents from a generalized VHD image when all of the regular build agents are busy. It uses resource groups to deploy build agent resources and supports authentication with an Azure Active Directory (AD) application.

While starting a new virtual machine, the plugin creates a new resource group and deploys required resources into it. When a cloud agent is terminating, the resource group with the allocated resources is removed.

The latest plugin version is available for download to the TeamCity 9.1.x users as a separate plugin which can be installed manually.

Azure Authentication Settings

The plugin accesses the Azure Resource Manager by leveraging an Azure AD application. To create a new application, follow the steps described in the Azure documentation. Then open new portal, navigate to Subscriptions, select the target subscription and assign a Contributor role to your Azure AD application.

Note: To find your application, type the application name in the users search box, because originally that list contains only usernames, not applications.

Virtual Machines Preparation

The plugin supports generalized VHD images to start new TeamCity cloud build agents. Perform the steps below to prepare VHD images.

New Image Creation

Create a new virtual machine with the Resource Manager via the new portal or cli tools, and configure it properly. Then fulfill generalization according to the Azure documentation for Linux and Windows virtual machines. As a result, you will get a VHD image in your blob storage.

Migrating Specialized Classic VM Image

If you previously used a specialized image or Start/Stop behaviour for a cloud build agent, you must capture it now. To do that, prepare a virtual machine by removing temporary files and then make a new image capture. Please refer to the Azure documentation for Linux and Windows machines. Then follow the steps below to migrate a generalized classic VM image.

Migrating Generalized Classic VM Image

If you already have a generalized VHD image located in the classic storage account, just copy it to a storage account created with the Resource Manager. To do that, use Microsoft Azure Storage Explorer.

Network Settings

To start new virtual machines, ensure that you have a Virtual Network and Subnet created in the target Azure region. If you already have virtual machines deployed with the Resource Manager, you can use them; otherwise you must create a new one and configure it as follows:

  1. Open the Virtual Network creation widget on the new portal and press Create.
  2. Fill in the settings and select the Resource Group located in your target Azure region.
  3. Press Create and wait for the deployment completion.

Note: To access your virtual machines by a public IP address, please ensure that you have properly configured security group rules for your Subnet.

Configuring Agent Cloud Profile in TeamCity

Open TeamCity Agent Cloud configuration and create a new Azure Resource Manager profile. Fill in the AD application credentials from the classic portal: copy the tenant id, client id values, and create a new client secret. Then select your subscription and target region to deploy new TeamCity build agent resources:

arm-credentials

Configuring Build Agent Images

Then add a new agent image in the cloud profile by pressing the Add image button and set configuration parameters:

arm-image

Source image is a VHD blob URL of generalized Virtual Machine. Please note that currently the Azure Resource Manager allows creating OS disk images only in the original storage account where the source VHD image is stored. More details are available in the Azure forum request.

Name prefix will be used as a prefix for the resource group name. Note that you must use unique prefixes within your subscription.

Network settings allow using the preliminary created virtual networks in your target location and optionally creating a public IP address for build agent machines.

After the image is added and the cloud profile is saved, TeamCity does a test start for virtual agents to gather the agent configuration. Once the agents are connected, TeamCity stores their parameters to be able to correctly process build configurations-to-agents compatibility.

Feedback

You are welcome to try the plugin for TeamCity, and your feedback will be really appreciated, so please share your thoughts in the comments to this blog post, in the forum or issue tracker.

Happy building in the cloud!

TeamCity Twitter Notifier

$
0
0

TeamCity provides several ways of getting notified about your builds’ status, like e-mail notifications, Jabber/XMPP instant messages and more. All the notifiers allow flexible customization to fit your needs.

However, there are other ways to keep track of your projects. For example, Scott Cowan has created TeamCity Twitter Notifier plugin. The installation is easy, and providing that Twitter allows to create private accounts, you can keep project notifications both restrictive and accessible. So if you like to twit, give it a try!

Twitter Notification

By the way, check the list of the plugins for TeamCity – you may find something interesting for you, or try to create your own.

Sincerely,
The JetBrains TeamCity Team

Rust plugin for TeamCity

$
0
0

Rust is an interesting programming language with decent tooling support. Cargo is an official build tool and a package manager for Rust programs. So what if you use Rust and want to configure automated builds in TeamCity? No worries, we have it covered! You can download the Rust and Cargo support plugin and install it as an additional TeamCity extension.

The plugin is compatible with TeamCity starting from version 10. It relies on rustup for managing the Rust toolchain.

The plugin detects the Cargo.toml configuration file once you add a VCS root to the Build Configuration, and suggests the corresponding build steps.

For the Cargo build step, it is enough to define just the name. However, multiple additional options are available under the “Show advanced options” link. For instance, it is possible to specify which packages and features the step should include, and which toolchain version should be used.

During the step execution, the plugin monitors the console output of the command. The summary is then displayed in the TeamCity UI: which tests were executed, how long it took every individual test to run, which tests were ignored, etc.

You can now build Rust programs with TeamCity and feel good about it! The plugin sources are available in the  GitHub repository and we are happy to receive your feedback in our forum and tracker!

Happy building!

Webinar recording and Q&A: What’s New in TeamCity 2018.2

$
0
0

Missed the webinar? No problem – the recording of our January 8 webinar, What’s New in TeamCity 2018.2, is now available.

In this webinar, Anton Arhipov showcases the major features of the latest release. He goes over the secondary node setup and explanation, building GitHub pull requests, showcases the simplified installation of plugins, previewing Kotlin DSL configuration in the UI, automatic assignment of investigations, and metadata in tests.

Enjoy watching and feel free to share with your friends and coworkers.

Q&A from the session

Q: Can secondary server node feature be used for migration to another server (add secondary, remove primary)?
A: Read-only (available in 2018.1 already) node can to some extent. We also plan to cover the use case when further extending the multi-node setup.

Q: The example shown for secondary nodes had both servers running on the same computer. Is this required, or can the secondary node be on a different system? And if it can be different, can it be on a different OS (Linux/Windows, etc.)?
A: They can be installed on different machines. Different OSes are also supported. It is required to share the data directory somehow (Windows SMB or Linux NFS will work). Still, it makes sense to have the same OS for both servers to simplify the setup.

Q: Does the Agent and/or Server restart when installing new plugins?
A: The server loads the plugin without restart. Since this plugin brings in an agent part, that agent part is automatically downloaded by all the agents and the agents are restarted automatically. This agent update just takes some time.

Q: When an Agent restarts, is it rebooting the machine or stopping and starting the TeamCity agent service?
A: Only the TeamCity agent service is restarted. The Agent restarts and updates without the whole machine restart.

New in TeamCity 2018.2: Simplified Installation of Plugins

$
0
0

Installing new plugins has just become a lot simpler! You don’t have to restart the server to enable a newly uploaded plugin anymore.

The TeamCity server now integrates with the JetBrains Plugins Repository. The new integration simplifies the installation of plugins for TeamCity.

By clicking the “Browse plugins repository” button in your TeamCity server, you will share some information (URL, server id, and version) with the plugin repository. With this information, the plugin repository is able to suggest installing the selected plugin version directly to your TeamCity server. The screencast below demonstrates the plugin installation procedure.

Aside from this, if you have disabled some of the bundled plugins on your TeamCity server, enabling them also does not require a server restart.

It is also possible to enable a periodical check for plugin updates on your TeamCity server. Once any updates are found in the plugin repository, they can be easily installed through the web interface. However, you’ll still need to restart the server to apply the plugin updates.

TeamCity-newPluginUpd

Finally, there is good news for TeamCity plugin developers. If you develop your plugins with the help of our Maven SDK or the Gradle plugin by Rod MacKenzie, you can benefit from reloading plugins without restarting the server. In addition to this, when TeamCity is started from these SDKs, it will work in a mode where the plugins can be enabled or disabled instantly, also without the need for a server restart.


Webinar Recording: Getting Started with TeamCity Plugins

$
0
0

The recording of our April 30 webinar, Getting Started with TeamCity Plugins is now available on the JetBrains YouTube channel.

In this webinar, we developed a custom runner plugin for TeamCity. The plugin adds a new build step for the echo command and displays the result of the execution in a custom tab for the completed build. You can find the source code of the plugin on GitHub.

The timeline:

4:23 – Generate project with Maven archetype
8:23 – Create server-side part of the plugin
18:31 – Create agent-side part of the plugin
24:47 – Configure TeamCity SDK Maven plugin
31:13 – Adding configuration UI to the server plugin
33:49 – Adding input validation
54:29 – Display results in a custom tab for the build

14 Cool TeamCity Plugins You Can Start Using Right Now

$
0
0

As you may know, the TeamCity Plugin Contest 2019 is in full swing and its participants are coming up with brilliant new creative solutions as we speak.

While TeamCity provides a lot of functionality out of the box and bundles a number of plugins in its distribution package, there are still use cases where you might need something extra. In this blog post, we are going to list 14 cool plugins that add new features or integrate with external tools. The plugins are not bundled with TeamCity in the distribution package but can be easily installed from the JetBrains plugins repository.

First, let’s take a look at the plugins that add new functionality to TeamCity for a very specific task in your build process. It could be a plugin that adds in integration with a build tool, provides a specific build step or a build feature, a UI extension, and so on.

Agents priority is a very nice plugin developed as part of our previous TeamCity Plugin Contest. The plugin lets you order TeamCity build agents by different criteria. Whenever a build starts, an available agent with the highest priority will be used.

tc-agents-priority

AutoProperties provides a build feature that can set parameters based on whether the build was triggered by a user. It can also set different parameters depending on those that exist already. The plugin will run before any build steps are executed, so the updated parameters will be immediately available.

The Gradle Build Cache plugin applies the Gradle Hazelcast settings plugin to enable remote build caching, and starts a Hazelcast node on the TeamCity server. This should make your Gradle builds run faster – very useful!

REST runner is also one of the plugins developed during the previous TeamCity Plugin Contest. It adds a build step that allows you to execute an HTTP request to an external service and handle the response using a Groovy script.

TeamCity OAuth is a lightweight alternative to the functionality provided by JetBrains Hub, enabling GitHub or generic oAuth2 authentication for TeamCity.

The SSH Tunnel plugin adds a build feature that allows SSH tunnels to be opened with port and socket forwarding. After adding the build feature to a build configuration, the plugin opens the configured SSH tunnels before the build starts, and any step in the build can use the established forwards.

Now for something different… Achievements is a fun feature that grants TeamCity users various badges based on their activities. The badges are displayed at the top of the screen, next to the user’s name. Here are a few examples:

  • Novelist – Granted for extra long commit descriptions.
  • Debugger – Granted for a series of commits mentioning fixed bugs.
  • Big Brother – Granted for assigning investigations to several different persons.
  • Boy Scout – Granted for assigning several investigations for a test or problem to himself.
  • … there’s more!

tc-achievemnts

Use the Achievements plugin to add some fun in your CI experience! 😉

The Invitations plugin lets you invite users to create or join TeamCity projects. We use this plugin at the test hosted TeamCity instance to simplify collaboration for users.

Kubernetes support is a plugin that allows TeamCity cloud agents to run in a Kubernetes cluster and provides a ‘Helm’ build step.

The Rust plugin for TeamCity enables you to build Rust programs with Cargo. The plugin detects the Cargo.toml configuration file once you add a VCS root to the Build Configuration, and suggests the corresponding build steps.

Bazel plugin adds a corresponding build step and integrates with the core functionality of TeamCity. This includes auto-discovery of build steps, Bazel tool detection on build agents, and cleanup of Bazel workspace caches. It also adds a build feature for Bazel’s remote cache in order to speed up your builds.

You can find many more interesting TeamCity plugins in JetBrains Plugins Repository. What’s more, you can become a plugin author – and the ongoing TeamCity Plugin Contest is a great opportunity to try your hand at this! So if you feel you’re up to it, hurry and apply!

Now, let’s look at another category of plugins that provide integration with external services to enhance your CI/CD pipeline.

A proper CI/CD pipeline today poses requirements that go beyond the traditional build process. This includes steps for security scanning, managing binaries, running deployment tasks, managing environments, working with the reports produced by the build server, and much more. For many of these activities, there are services or tools that integrate nicely with TeamCity. Here are a few interesting tools that will help you build a sophisticated CI/CD pipeline in collaboration with TeamCity.

The Snyk plugin adds the ability to test your code dependencies for vulnerabilities against the Snyk database. When you use the Snyk plugin in TeamCity, the build process makes sure that it is in line with the Snyk org’s rules. The build will fail if the security scan detects that the code is vulnerable beyond what the policy allows.

As a result of a build process in TeamCity, we often produce binary artifacts that can stay in the build server. However, there are products tailored for working with binaries which are definitely worth using for managing your artifacts. Artifactory is a tool designed to work with binaries, and the Artifactory plugin for TeamCity makes the integration possible.

Beyond managing the efficient deployment of your artifacts to Artifactory, the plugin lets you capture information about artifacts deployed, dependencies resolved, environment data associated with the TeamCity build runs and more, that effectively provides full traceability for your builds. (link)

Not only do we produce and manage the binaries in the CI/CD process, but we also need to somehow deliver the artifacts into the environment to serve the business. Octopus Deploy is a convenient tool for delivering software packages to the servers.

The Octopus Deploy plugin for TeamCity integrates with the Octopus Deploy server in order to deliver NuGet, zip, tar, gzip, tar, bzip2, jar, war, ear and rar packages for deployment. TeamCity builds the packages and runs tests, and then Octopus Deploy takes those packages and pushes them through the development, test, and production environments.

OD

We recently hosted a webinar about using Octopus Deploy with TeamCity and the recording is available for you to watch.

As you can see, there are plenty of interesting plugins for TeamCity tailored to many specific use cases. I would venture a guess that you, too, may have a particular use case that stands to be implemented via a plugin. Fancy having a go at it? There’s still time left, so apply for the TeamCity Plugin Contest, submit your solution, and win the day!

TeamCity Plugin Contest: submissions are closed, you can now vote for the plugins

$
0
0

The TeamCity Plugin Contest has entered its final chapter as we yesterday closed the door to any more plugin submissions. We would like to thank every one of the participants who spread the word, joined the contest, and spent their valuable time developing new plugins. Thank you all – we really appreciate your efforts!

TeamCity Plugin Contest 2019_e-mail-03

Of the 89 developers registered for the contest, 15 submitted valid plugins, each of whom have received a 1-year subscription to a JetBrains IDE of their choice. Congratulations!

Submissions for the contest are now closed, and so begins the judging and voting for the best plugin. You can review all the submitted plugins and vote for the ones you like the best. The author of the most voted plugin will receive the People’s Choice Award.

Vote for plugins

We will announce the five winners on July 17.

So fingers-crossed, be patient, and don’t forget to pick your favorite plugins. Follow our blog or twitter for the winners’ announcement.

Thanks again and happy building!

TeamCity 2019.2 RC is out

$
0
0

TeamCity 2019.2 release candidate is already here.

This build fixes over 180 issues and gives a first look at several notable release features:

  • New flexible clean-up rules that allow you to fine-tune what types of data to preserve during the clean-up.
  • Portable Kotlin DSL now can be parametrized.
  • Secondary nodes now allow performing the most common user actions on builds, such as adding builds to the queue or assigning investigations.
  • The experimental TeamCity UI is available for Tests and Changes tabs of Build Details. We are also presenting a redesigned version of the Agents page:
    Experimental Agents pageNote that the experimental UI is a work in progress and an optional alternative to the classic UI. Based on your feedback, we will make sure to optimize it and migrate all the important classic features in the future releases.

Read more about all features and fixes in our release notes and download Kanpur 2019.2 RC build.

Remember that TeamCity RC builds come without the EAP license, but the license for the previous EAP release is valid for this RC version as well. It is important that you install it on a trial server as the new version will modify the data format, but downgrading is not supported.

Your feedback is always welcome in our forum or issue tracker.

The new version of TeamCity is on its way – follow our updates, and

Happy building!

TeamCity 2019.2 is here with new clean-up rules, EC2 launch templates, a build chain DSL, and more

$
0
0

TeamCity 2019.2 gives you great new ways to manage the clean-up of your builds and to monitor your server’s performance. It supports EC2 launch templates, and features a new DSL syntax for defining build chains. It also provides an easy way to run personal builds with Git patches, and adds many improvements to the experimental UI.

blog_teamcity-2019.2

Power up your clean-up

TeamCity 2019.2 opens new dimensions of control over the historical data and artifacts created by your builds. A reworked clean-up engine allows you to set up different clean-up policies with a wide spectrum of filters: for example, you may choose to keep all builds from specific branches, or with specific tags.

We believe that new clean-up rules will be particularly useful for companies that have a lot of projects, and for teams that use feature branches during development.

blog_clean-up@2x

Bird’s eye of your CI

Pros love tools that help them monitor how mission-critical systems are behaving and performing. Starting with 2019.2, TeamCity exposes its metrics via an HTTP endpoint, so they can be scraped by Prometheus and then visualized via the Prometheus web interface, or in a Grafana dashboard.

The metrics include the server performance information, as well as various details on agents, projects, and build configurations.

metrics@2x

Scalability, taken further

For many large organizations, a high-performance CI is critical to their workflows. TeamCity takes another step toward a multi-node setup allowing you to add builds to the build queue, manage build problems and investigations, and perform other user-level actions – now on a secondary server.

More ways to be productive with experimental UI

Developers often open TeamCity many times a day, which is why we want it to be a place where they can quickly find what they need, regardless of the size and complexity of their projects. Following the TeamCity UI roadmap, we are introducing a new build page that gives you an easy way to browse build history, investigate problems, and discover any misconfigurations or bottlenecks in your build chains.

Check out the experimental UI – we’re proud of how it now looks and feels.

build-page@2x

EC2 launch templates. Builds taken to new heights

We want TeamCity to have everything you need in a modern workflow. Version 2019.2 adds support for EC2 launch templates, and lets you run cloud build agents using the launch parameters from your AWS account. With the launch templates, updating and installing new software on build agents becomes a very simple and straightforward task – you no longer need to change anything in the TeamCity project configuration.

ec2-launch-templates@2x

Level up your DSL

Build chains, built easily

Goodbye clicking, hello scripting. The Kotlin DSL now provides a simple and very straightforward syntax for defining build chains. Set up sequential and parallel builds, configure failure conditions and dependencies – and store everything as code.

Many parameters. One template.

Project configuration just got easier. Starting with 2019.2, your Kotlin DSL configurations may include custom parameters, which you can define later when importing the project in the UI.

Run more. Wait less. Start builds with Git patches.

Quickly test your changes by creating a Git patch, uploading it to TeamCity, and running a personal build – without creating any branches or committing anything.

create-patch@2x

For the full list of changes in version 2019.2, see the TeamCity documentation.

Download TeamCity 2019.2

Please check through the upgrade notes before you install the new version, and do not hesitate to report any issues in our tracker or ask questions in the forum.

Viewing all 91 articles
Browse latest View live